
Tutorial: Creating a Potted Plant
This tutorial is set up to explore a the tools of the Editable Poly modifier and the different techniques of poly modeling. It is understood that you are familiar with the UI and terms of 3D Studio Max.
The Pot:
Start by creating a cylinder with:
Radius: 10
Height: 15
HSegs: 1
CapSegs: 1
Sides: 12
Rename the cylinder Clay Pot.

Right click on the cylinder and convert to an Editable Ploy.

Select the Polygon Sub-Object mode and select the top poly of the cylinder.

Next choose the Inset tool from the Edit Polygons rollout, an amount of 1 is fine so you can just select OK.

Select the Extrude tool from the Edit Polygons rollout, and apply an amount of -14.0. This will create the basic volume of the Clay Pot.

Now to refine the shape of the Clay Pot. In your front view port select the Vertex Sub-Object mode. Select the bottom rows of vertices.

Select the scale tool and scale the selected vertices about 65% of their original size. This gives the Clay Pot a slight tapered appearance.

Now to add the rim of the Clay Pot: Select an outer Edge.

Use the Ring tool to select all other edges that are close to parallel.

Next select the Connect tool. The Connect tool is very important and useful; it allows you to add segments to add in more detail. When you bring up the Connect Edges dialogue box just change the Slide to 65. You will notice that there is now a new row of edges.

Select the new Polygons that you just created.

Choose the Extrude tool from the Edit Polygon rollout; change the Extrusion Type to local Normal, and the Extrusion Height to .5. This will create the rim of the Clay Pot.

We will now have to clean up the mesh a bit, choose Vertex Sub-Object mode and select the Target Weld tool under the Edit Vertices rollout. We are going to select the middle row of vertices on the rim and weld them to the outer vertices.


Complete this process for the whole rim. This step is important because we are lowering the poly count on this object by eliminating Polygons that do not contribute to the overall shape of the pot. In this process alone we are dropping the poly count by 24 faces.

If you render out an image of the Pot you will notice that everything look okay but the inside of the pot. Instead of it being smooth it is faceted; to fix this issue we will need to adjust the Smoothing Groups of the object. Smoothing Groups are always overlooked but are critical to creating high quality models. They tell 3D Studio Max which faces are smoothed or not. If you smooth two faces together the render will shade them as one piece of material with smooth shading, but if you give them different smoothing groups it will render them with a crease.

To fix the Pot select all the Ploys for the interior wall of the Pot.

With those faces selected go under the Polygon Properties rollout, you will notice a section called Smoothing Groups. Choose 32 as the smoothing group. Basically as long as 2 faces have different Smoothing Groups they will not smooth and if they have the same Smoothing Group the will smooth together. We do not want the inside to smooth with the rim so we must choose a group that is free, and 99% of the time 32 is an open group.

If you render back out you will now notice that the inner walls are smooth!

The Dirt:
Along with the Clay Pot and the plant we will also need Dirt. This will be simple and basic. Select the very bottom polygon, hold shift and move it up along the Z axis. You will get a Clone Part of Mesh dialogue choose Clone to Object and rename it Dirt.

Select the Dirt object and under the Poly Sub-Object scale the dirt to fit into the Pot, you want to make sure it goes through the inner wall but does not intersect the outer wall. I also changed the dirt color so we could see a difference between the dirt and the pot.


The Plant:
Creating the Flower:
Start by creating a plane:
Length: 2
Width: 5
LSegs: 1
WSegs: 1
Rename this plane Flower Pedal, and convert it into Editable Poly.

We are going to add a couple of basic Connects to the Flower Pedal. Select the top and bottom of the plane and use the connect tool to get a segment running the length of the plane.

Adjust your verticies so that you plane looks like this:

Next select all three edges running the length of the Flower Pedal.

Use the Connect tool and add 3 segments to the Flower Pedal.

Adjust the verticies to look like this:

Next we will give the Pedal a slight curve, select the very top vertex on the Pedal, and open up the Soft Selection rollout. Activate Soft Selection and choose a Falloff of 5.

Next use the rotate tool to give the Pedal a curve. I rotated the vertex about -40 degrees.

Exit out of Soft Section.
We are going to clone the Pedal to create the Flower but first we need to adjust it Pivot Point. With the Pedal selected go to the Hierarchy Panel, select Affect Pivot Only and move the pivot point so that it is slightly off the end of the Pedal.

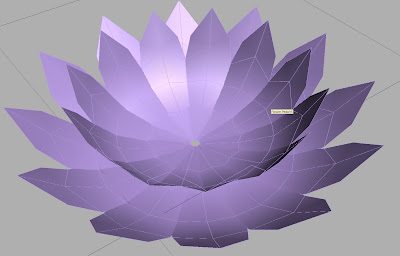
Next Clone the Pedal to create the Flower. Using the rotation tool hold Shift and rotate the Pedal 30 degrees and Clone out 11 Copies.


To finish off the Flower simply select a Pedal scale it down slightly, and rotate it into position and repeat the process a couple of times.


Creating the Plant:
I decided to go with a cactus to help simplify this tutorial. Choosing a plant with foliage like a rose bush or even a tulip would be a bit more difficult.
Start by creating a Sphere:
Radius: 6.5
Segments: 40
Rename this sphere Cactus and convert to an Editable Poly. Under Edge Sub-Object select every other edge at the top of the sphere.

Under the Selection rollout of the Editable Poly modifier hit the loop button to select all the connected edges.

Deselect the very top and bottom edges on the sphere.

Use the Extrude Edges tool under the Edit Edges Rollout. Height .65, Extrusion Base Width 5.0.

Select only the very top and bottom vertex, using the Soft Selection rollout with a Falloff of 11 and scale the Cactus 50% on the Z axis.

Deselect Use Soft Selection.
Select the Cactus by selecting the Element Sub-Object. By holing Shift drag a clone of the Cactus and Choose the Clone to Element option.

Under Vertex use a Soft Selection with a Falloff of 6 to scale the clone Cactus down an addition 50% on the Z axis in the same fashion as the previous step.

Using Elements select the second Cactus and Scale down to 30%.

Place this Element along the top of the Cactus, and repeat this process a couple of times until you get the desired look.

Now place the Cactus in the Pot.

Next we need to place the flowers on the “Stumps” of the Cactus. The Problem is the Flower is still about 100 different pieces so we need to fix that. Some people may use a Group here, that is bad. Never use a group if you ever, I mean ever, plan on animating an object. Instead we will simple Attach them together. Select any of the Pedal and go to the Modifier Panel. Select the Attach by List button.

Select all the Pedal objects. We will need to adjust the pivot point to under the Hierarchy Panel Select Affect pivot point and Center of Object.

Now carefully place the flowers on the Cactus stumps. This is not easy, it’s not hard just tedious. Once you get the flowers placed we will be ready for textures.


