

Showing posts with label Portfolio. Show all posts
Showing posts with label Portfolio. Show all posts
Thursday, March 13, 2014
Smash & Bash! Brawl (Beta)
I have recently finished up my final project for my Master's program. I took the previous concept of Smash N Bash! and created a new prototype called Smash & Bash! Brawl. I am still testing out the bugs, but I have added several features to the old prototype to make it its own game. I may put the box smashing concept in as a bonus level or mini-game in the future. Below is a link to the game and two videos of game play.
Game Link: https://dl.dropboxusercontent.com/u/107120067/SNBB/Web.html
Monday, February 4, 2013
New 2013 Game Dev Demo
Hi everyone. I posted a new demo that focus on my Unity3D development. It is located at the top of the home page above my 2011 modeling demo. I have some big plans for 2013 so make sure to stay tuned to keep up to date and so that you can help support the cause. I should have a new version of Smash N Bash!, but that will not be until late 2013. This time around there will be character combat and many more moves. Plus it will work with a Xbox 360 controller. Until then I will be promoting "Galactic Empires", my exciting new board game that I hope to get on the shelves this year, well maybe next year. It is on its final phase of testing before it goes public. I am hoping by the end of the month I will have the downloadable (free) version ready for your enjoyment. Until then here is a sneak peak at the game board and pieces:

To finish things off here is the mesh of a new model I am working on, do you recognize the subject?

To finish things off here is the mesh of a new model I am working on, do you recognize the subject?
Thursday, December 13, 2012
Various Game Animations
This video showcases some of the animations I have completed while working with Unity. Each animation was for a different prototype/concept. I do want to note that the Flick the Frog model was not completed by me but by a colleague of mine. I did rig, animate, and complete the tongue/stomach area of Flick, but not the base model or the textures. All the other work is mine: modeling, texturing, rigging, skin/binding, and animation.
Thursday, November 15, 2012
Smash N Bash! the Game
Finishing up on another quarter at SCAD. This quarter I took Interactive Design and Media Application and as usually I have been quite on the blog for a little while,... which only means I have been up to no good. I actually have two new games this quarter coming out of my class. On is a board game, I will post that up shortly. But as of now, it is still semi-secret. But for Smash N Bash! you can check it out now. Really this is just the base concept for a much larger game, but I was successful in creating my own character controller, a combat system, and I had a lot of fun getting the animations to work. Mainly I will be able to keep working with this concept and build an awesome beat'em up game.
You can download Smash N Bash! here for FREE, both PC and MAC:
https://docs.google.com/open?id=0B1bXgW_QvTdjM0RaMFFZaWxVUVk
Friday, August 31, 2012
Vograk Hammerfist
I just finished up on this project yesterday and ended another quarter at SCAD. I put a lot of time and energy in this project; I re-did the base concept several times, and once more even after locking the look down. I had several re-packs with the UVs. At first I had add the elements on one layout, but then I decided to break the model up into three UV sets. The body, the beard, and the accessories of the armor were all separated into different UVs and textures. This helped future proof this model, and turn it into a modular dwarf generator. Different beards, different armor accents equals an army of dwarfs. Se here is the end result from the course, but I will continue to work with Vograk and get him in a game, I do have that ogre for him to battle. But I do think I need a couple more assets before I move on to the game play. I think a good goblin character may be in the works.


Friday, July 6, 2012
The Ogre - Update

Wednesday, December 7, 2011
The Ogre Rig
Here is a rig I am currently working on for a new ogre character. My portfolio was absent a really nice custom rig, so I took to the challenge and create a custom rig for my ogre character. Normally I use character studio due to the advantages of the modular animation setup, but with this model and what I intend to use it for, a custom rig was a solid choice. I worked out twist bones on both the arms and the legs, I went threw several setups on that, and added in a facial rig and bones for his loin cloth. One I finish I will give updated shots on my blog. Here is what I have left to do: finish textures, skin, and animate. I hopefully will have it completed by the new year. And once that is done off to Unity he goes, he'll make an excellent character for my arena concept. Hint, hint!


Friday, February 11, 2011
Portfolio - 2011 Demo Reel and Images
I have just moved "The Balor" video from the top of the page to the bottom and replaced it with my new 2011 Modeling and Textures Demo. I have also posted several new images in this post that I used for my SCAD portfolio. Some of them are repeats, but I wanted to post them for future reference when lecturing. They include mesh renders and UV layouts of various models.
Soon I will be posting up the video game. I finally finished off that project. Once I get the website up and running I will let you know were to go. It will be a free download for you to enjoy. I'll keep you posted!


Soon I will be posting up the video game. I finally finished off that project. Once I get the website up and running I will let you know were to go. It will be a free download for you to enjoy. I'll keep you posted!


Monday, January 10, 2011
A New Year Update: A New Head Model
It may seem like I have been quite, and that's because I have. I am working on a deadline of Feburary for my Graduate Portfolio, I have completed up some models for it and I am very excited about the results. But more exciting is the fact that I have resurected my game, and better yet, if it is not done by the end of this week it will be completed in the next couple of weeks. I am going to keep this breif so I can get back to the grind, but here is a nice teaser of what is to come with my new portfolio. I will make sure to write up a full article as soon as I am done with the game.


Saturday, October 30, 2010
Portfolio: Al Capone 3D Model
Here is the model of Al Capone that I have been working on. This was the first face model that I was applying the Reilly method to 3D modeling of a head. It has the planes in the cheeks, and forehead, and based upon the results here I forced even more Reilly planes into my next character model, with even better results. I used 3D Studio to model Al, and Mudbox and Photoshop to to the majority of the texture work.
It was a bit different also, normally I would work off the high quality reference I could find, but since the technology and logging of information in his day was not up to par, I had to work around issues with low quality reference and really a lack of reference all together. Great stories and headlines, but no 10 mega pixel images to go with it. What was there was black and white, or yellow. So color was an issue, and not being able to use the modeling reference and a texture base was also a fun one to work around. That may also be the reason that Al has a slightly cartoon feel to him, one I actually did not want, is due to the lack of reference up to the task to be the textures. In fact I could not find one to use, I had to piece together other refs and create a bunch from scratch. He does meet the standard I was going for as far as overall quality and poly count, along with learning uncharted modeling techniques for the forehead and cheeks, Al will go down as a very successful project.
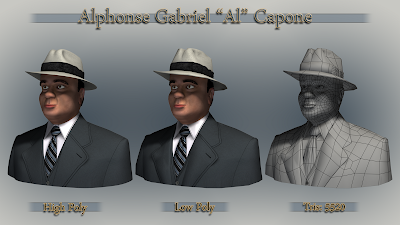
I created a model sheet and a model breakdown of the Al Capone 3D model, hope you enjoy!


Saturday, September 18, 2010
Portfolio: The Moon Wurm

This is a model I had sitting around. I created him to be a boss in the Tower34 game I have been working on but never posted it up for the world to see. The Wurm is rigged, animated and ready to go. I have already tested it in Unity3D. I gave it a simple character controller and even created a simple game were the wurm eats mines. Currently I am unsure of the state of Tower34 though, I ran into a critical error as far as the game play is concerned. I am left with the choice to try again or to start on of the many new ideas for a game that I have. I am leaning towards simplifying the game and at least try to salvage what I have. That way I do not just chalk this up to a learning experience, but actually get my homage to Galaga that I have always wanted to make.
Here is a stereoscopic render and a scene breakdown, hope you enjoy!


Monday, September 13, 2010
Portfolio: Life Drawings
I just started a new blog to keep track of my life drawing progress. I started sitting in a couple of classes about six months ago to help meet the life drawing requirements for the master's degree I am looking into. I was very rusty at first but my recent drawing do show much improvement, each week they seem to get better and better. I will keep updating my progress.
Here is the link: papertopoly.blogspot.com
Here is the link: papertopoly.blogspot.com
Monday, August 2, 2010
Portfolio: Model - Lamborghini Reventon

I finally completed the Lamborghini Reventon model I have been working on. I had the model completed about 6 months ago but never moved on to the textures. Over the past couple of weeks I spent a few of hours finalizing the materials. This is one of the more sophisticated car models I have produced and I had a lot of fun on the production. I guess now I may have to make a simple game so I can drive it. Hope you enjoy!
Friday, July 16, 2010
Portfolio: Character Models - Cartoons
Here are three characters that I have created. They all started as small sketches that evolved into full 3D characters.
The Ant Man was most recent, I modeled him in Maya and textured in Mudbox. I may supply him to a future Prototyping class for their main character, but until then he will go into the archive. I had a lot of fun sculpting his armor plates to separate up the different sections of his anatomy.

The Toadadial is a mix between a toad and a croc. The main objective of this model was to play around with Mudbox and learn the sculpting and texturing tools available in that software package. I also wanted to combine to very foreign worlds by giving the character a cartoony feel but using realistic textures.

Skel Eton I have actually had completed a while ago. I even have a full 3 minute animation involving this character. I was drawing cartoony skulls, and one of the results was the motivation for this character.

Thursday, June 10, 2010
Portfolio: Mr. Apgar

I had this model in my archive for a while now; I think I actually modeled him (me) about 2+ years ago. I have even completed the rigging and UVs of the model as well, but for some reason I stalled out on the textures. Other projects, lack of time, distractions... whatever the excuse I finally got around to completing the final version of my Mr. Apgar model. I have used it several times in my animation lectures, but the next time I use the Mr. Apgar model in class it will have nice textures to go with the animation.

Monday, April 19, 2010
Portfolio: Custom Depth of Field in Photoshop

While I was working on a hallway scene using Mental Ray I ran into some issues. I was not happy with the result that the Mental Ray renderer had with its Depth of Field effect. It was fast but very grainy, more like sandy noise than a blurred effect. I was disappointed to find out that the old DOF effect from Max's scanline was not available in Mental Ray, it may take a long time but the effect was great and could produce a very high quality DOF effect.
I started to play around and I came up with an idea to reproduce the same effect. The old scanline effect would simply move the camera re-render and overlay the images to produce the DOF effect, so I proceeded to move the camera in 3d to attempt to reproduce the effect. I started by moving the camera 4 units to the right and took another render. I wanted to test the DOF effect before moving any further to see if it even had the right effect, what is discovered was not a DOF is was a stereoscopic effect. As soon as I overlayed the two renders I realized it would work for a DOF but instead I produced a 3D image. All I need to do was set the left image to red, and the right to cyan, overlay the two and "poof" the magic of stereoscopic imagery.

That was cool and sparked a love of stereoscopic 3d, but was not the effect that I wanted. While playing around with the stereo effect I realized the solution for the DOF effect was a simple . All I need was a Depth Map and Photoshop. I rendered out a frame and the depth map for that frame. The depth map is a gray scale representation of the z-depth of your scene, all you need to do is use the Color Select option in Photoshop to select out the range of gray that you want to be in focus. Invert your selection and then use the Lens Blur to reproduce the Depth of Field effect. The result is higher quality than in Mental Ray, and still takes only a fraction of the time from the scanline effect.
Original Render:

Depth Map Render:

Depth of Field in Photoshop:
Tuesday, December 8, 2009
Portfolio - Delahaye 1938
Here is a model of an old 1938 Delahaye I have recently completed. It was a fun car to model with its curvy body and wheel wells. This car model is also the first time I have included an interior of the vehicle. It really helps drive this car to the next level along with the new Mental Ray shaders available. Currently I am in the process of completing a Lamborghini Reventon, so keep your eyes out for that model.


Friday, November 6, 2009
Portfolio - 2010 Demo Shot Re-Worked
Here is a shot I re-created for my 2010 demo, this was the opening shot in the 2009 demo I threw together. You can see the refinement in the environment, better mountains, rock layout and the addition of foliage to fill the scene and give it a splash of color. I also used two seperate cameras to help show off more of the environment. The toad like character has also been added to this scene sitting on a rock eating a fish. It has a better feel than before, and with the addition of the character it really helps breath life into the shot.
Thursday, August 20, 2009
Portfolio - Tower 34
Tower 34 was a game concept that I was working on with a friend and colleague Clinton White. He was handling the programming side and I was handling the graphics. Here is the result of the ship that was going to be the main character for the game. I started by combining several random shapes together just to see what looked cool. From there we selected a couple of combinations that would work for the ship, some for backup support ships and other shapes even fit well for the bad guys of the game. I took the shape combination that we selected for the ship and refined into about 10 other ships of similar shape. From there we choose the final shape and I further refined it into a top down drawing so I could model the ship in 3D.

Here is the concept for the background. The city is hidden in the renders, the game was supposed to be top down, and as of now the city only looks good from that top down perspective.
Here are some 3D Renders of Tower 34 and the Ship.


Here is a basic cinematic of the ship taking off.

Here is the concept for the background. The city is hidden in the renders, the game was supposed to be top down, and as of now the city only looks good from that top down perspective.

Here are some 3D Renders of Tower 34 and the Ship.


Here is a basic cinematic of the ship taking off.
Monday, July 6, 2009
'69 Dodge Charger

Here is the 1969 Dodge Charger I modeled with my 3D Modeling class in Spring of 09. I went a little further and placed it driving down the coast in a short and simple animation. Hope you enjoy!
Subscribe to:
Posts (Atom)

