
This video showcases some of the animations I have completed while working with Unity. Each animation was for a different prototype/concept. I do want to note that the Flick the Frog model was not completed by me but by a colleague of mine. I did rig, animate, and complete the tongue/stomach area of Flick, but not the base model or the textures. All the other work is mine: modeling, texturing, rigging, skin/binding, and animation.

Thursday, December 13, 2012
Thursday, November 15, 2012
Smash N Bash! the Game
Finishing up on another quarter at SCAD. This quarter I took Interactive Design and Media Application and as usually I have been quite on the blog for a little while,... which only means I have been up to no good. I actually have two new games this quarter coming out of my class. On is a board game, I will post that up shortly. But as of now, it is still semi-secret. But for Smash N Bash! you can check it out now. Really this is just the base concept for a much larger game, but I was successful in creating my own character controller, a combat system, and I had a lot of fun getting the animations to work. Mainly I will be able to keep working with this concept and build an awesome beat'em up game.
You can download Smash N Bash! here for FREE, both PC and MAC:
https://docs.google.com/open?id=0B1bXgW_QvTdjM0RaMFFZaWxVUVk
Friday, August 31, 2012
Vograk Hammerfist
I just finished up on this project yesterday and ended another quarter at SCAD. I put a lot of time and energy in this project; I re-did the base concept several times, and once more even after locking the look down. I had several re-packs with the UVs. At first I had add the elements on one layout, but then I decided to break the model up into three UV sets. The body, the beard, and the accessories of the armor were all separated into different UVs and textures. This helped future proof this model, and turn it into a modular dwarf generator. Different beards, different armor accents equals an army of dwarfs. Se here is the end result from the course, but I will continue to work with Vograk and get him in a game, I do have that ogre for him to battle. But I do think I need a couple more assets before I move on to the game play. I think a good goblin character may be in the works.


Thursday, August 9, 2012
Character Development Project
I have been working on a project for my Character Development class for my MFA, and by the name of the class if kinda gives away the secret. I am taking a rest from the game dev for a moment and am really trying to flesh out an awesome character. I decided to do a dwarf character and really have some fun with both the character's personality and design. I have just completed the model, so now it is time to unwrap and start the sculpts. I will update once I get it finished, but for now here are some of the concepts for Vograk Hammerfist.
At first I ended up creating 4 different suits of armor. I just tried to get some different styles and designs on the character to see what they looked like. I was leaning to the Roman style armor at first. But then one of
 my classmates gave me the idea of adding in a Viking feel to the armor because he felt it fit the dwarf, and I agreed. So I added some more features to the Roman style armor to add in a touch of Celtic / Norse feel to the armor. I also added in his shooting glasses as a pair of flip down goggles off his helmet. A feature that added a nice touch and brought across some of his personality and character traits. And this brought the armor count up to five. But it got better and worth the extra effort.

 I also did some color tests to see how the armor was working out with some color added to the mix. I was thinking the brown / orange armor would work will with the characters blue skin tones.
The next morning after submitting this stage of the project, I realized that I did not include a huge detail about the character. He is supposed to be a prestigious guard and had eagle / bird motif armor to match the gig. But that was no where to be found in my design. Okay,... here come the 6th set of armor, and by far the coolest. It was a lot of extra effort but well worth it in the end. Here is Vograk's model sheet, and just so
 we are all one the same page... yes that is a gun / axe, well actually it is a blunderbuss and an axe.
The 3D model has gone smoothly, no real hiccups there. I did come dangerously close to the courses poly limit though. We had 16,000 tris to work with, and I used about 15,700 tris. There are plenty of ploys I can reduce, but for now I will hold back at least until after the sculpt.
 The checker boxes are 6" x 6" squares to give you an idea of scale.
At first I ended up creating 4 different suits of armor. I just tried to get some different styles and designs on the character to see what they looked like. I was leaning to the Roman style armor at first. But then one of


The next morning after submitting this stage of the project, I realized that I did not include a huge detail about the character. He is supposed to be a prestigious guard and had eagle / bird motif armor to match the gig. But that was no where to be found in my design. Okay,... here come the 6th set of armor, and by far the coolest. It was a lot of extra effort but well worth it in the end. Here is Vograk's model sheet, and just so

The 3D model has gone smoothly, no real hiccups there. I did come dangerously close to the courses poly limit though. We had 16,000 tris to work with, and I used about 15,700 tris. There are plenty of ploys I can reduce, but for now I will hold back at least until after the sculpt.

Wednesday, August 8, 2012
Skin Weights Diagram
As requested by a student here is an image that shows the skin/bind weights on a humanoid character. Not every character will follow the same weights, but this image can be used as a guideline to help get you started. Remember it really only matters how it looks when it is moving, so if your weight distribution is not exactly like mine that is okay and expected.


Friday, July 6, 2012
The Ogre - Update

Tuesday, June 5, 2012
Environments for Games - Final Project - Primal
Here is the result of my final project for Environments for Games for my MFA at SCAD.


Thesis:
Survive and evolve. You exist in a prehistoric world with dangers lurking around every corner; your mere existence is a struggle to survive. Some days even the simple tasks of eating and drinking become the entire days work. As you go day to day the local food sources dry up; you have pick all this seasons berries, the local fish stock is over fished, and your presence has scared away most of the game animals. You survival now becomes exploration of the environment, you must find greener pastures and along the way gain knowledge and build relationships to evolve your species.
Synthesis:
As you survive day to day your interactions with the environment will gain you knowledge and understanding of the environment, survival skills and techniques, and later on building relationships. This will give you more options and choice in the game as you make the decisions on how to survive and what skills to develop to make your daily life easier and to evolve into a lasting race. This will lead to different hunting skills and weapons, formation of communities, and a unique game play scenario for each player every time.
Antithesis:
To survive you must maintain the basics of life: food, water, and sleep. These also represent your name stats in the game: Hunger, Thirst, and Energy. To eat you and forage the land to find: berries, vegetation, and mushrooms; and you can hunt: insects, fish, birds, and animals. There are several local water sources to drink from, but as you venture outward from your known world finding water can be the difference between you having offspring or your genes being wiped from the pool. The last part to the basics of survival will be to rest/sleep. You will be allowed to sleep anywhere you want, but the key will be to choose a safe place to rest. Otherwise you may find natural selection knocking at your door as the night gives new challenges to your existence.
To maintain Hunger you have to eat. You can do this by interacting with vegetation, berry bushes and fruit trees, and by hunting animals in the environment. To hunt anything but insects you must have a spear that you can fashion from the environment; more on the spear later. This is key, because you need to find both protein and nutrients to have an ideal existence. There are two other elements that come into play; nutrient food sources like berries and fruits will give you a quick burst to your Energy stat but will not keep Hunger filled as long. Protein on the other hand will keep your Hunger stat filled longer but it will also consume some energy when eaten.
There are several berry bushes places in the level to help the your survive and to aid in exploration. A large fruit tree can be discovered to help sustain you after the berry bushes run out of berries. There are also several sources to fish from in the environment as fish are possible found in the deeper areas of water. To true to all survival, water can play a critical role in your existence as finding and drinking from a water source is how you maintain your Thirst stat.
The second aspect of the game is to evolve the character with knowledge you gain from exploring and living day to day. For example you can figure out that smashing two rocks together can result in a sharp rock that you can cut with. Applied to a stick or some wood you can sharpen an end to use to spear fish or other animals with. You can also observe another eating certain vegetation allowing you to know it is safe to eat, or crafting an item of useful purpose. Overall there will be a slight feel of trial and error as well.
A good example is the spear; initially the spear is a combo nation of using a sharp stone on a long stick. (Sharp Stone result from stone v stone contact, Long Stick result from sharp stone v tree.) The spear is simple to make but will increase your options of how you can interact with the environment. With the spear you can hunt by throwing the spear or by thrusting the spear; allowing you to gain additional sources of protein. You can continue to refine the spear by combing in a long stick, a short stick, animal hide, and a sharp stone you can create an alternate spear that will give you bonuses when fishing, but breaks easily when thrown. (Short Stick results from using the sharp stone on a long stick, you get three short sticks for every long stick) You can also upgrade the spear if you have a long stick, animal hide, and a piece of sharp shale to a spear worthy of hunting larger animals like dear and mountain lions. (Sharp Shale results in using a stone on a shale vein.)
Tuesday, May 8, 2012
Environments for Games - Interactive Level
Here are the results for Project B - Interactive Level for my Environments for Games course at SCAD for my MFA.


Thesis:
You awake in a crypt with no apparent way out; your memory is fuzzy, and how you came to be in this crypt is a mystery. Finding a way out seems like the best idea, who knows how long you can stay sane trapped in a crypt. This is the first of several trials to save your soul from being trapped in the underworld forever; can you survive the crypts trials and be granted the blessing of the gods?
Back Story:
In life you were a great warrior, worthy of the gods’ attention; but it has been centuries since you have walked the physical realm. Disturbed and awaken from the dead to compete in an arena of champions throughout the ages. A contest to end the bickering of the gods and to prove once and for all, not only who was the greatest warrior to ever exist, but when. Before you are to be forfeited to the gods for their entertainment, you will have to overcome The Trials to prove that you are worthy of the arena and the battle for eternal glory.
Synthesis:
The player will be rewarded the sword and shield that they must find to finish the crypt’s trials. The idea would be that this is part of a larger campaign or world in an adventure RPG. So the sword would be special in some way, i.e. extra magical damage, required for a quest. The buildup in difficulty and defeating the boss skull is another form of reward, and will offer closure on the trials and give logical conclusion to advancing in the game/level. This will also help the player gain a better understanding of the character’s controls and actions. These factors will offer the player a reward greater than the risks of the level making sure they do not feel cheated upon completing the objectives.
Antithesis:
A continuous buildup of challenge, interaction, and difficulty will drive objectives the player must overcome in the level. To allow the player to get familiar with the controls the first conflict is a simple objective of finding an object in the scene and placing it in a location in the scene. Although this may be the easiest objective as far as skill is required, it is probably the hardest when it comes to problem solving skill. From there the player’s next set of tasks result in challenging the player's skill at moving the character on the screen and developing those skill sets. Building from previous knowledge of using the character controller. The next set of challenges includes dodging traps and enemies but also act as a tutorial on how to use the newly acquired shield. The final set of objectives, the boss area, will include combat with basic AI. The player will have to use their skills with movement, blocking, and timing their attacks to kill the enemy AI. The final challenge is a boss skull with the ability to hit you at range increasing the level of difficulty once again for the final battle of the crypt.
This sets a nice slow but steady learning curve in the level. It will help build the players skill but keep them challenged the entire time and increasing the entertainment value of the gameplay.
Interactivity Breakdown:
You will start off in a crypt and you will have to find a way to unlock the door. To do this you have to offer a prayer offering to the gods overseeing the crypt. You will have to find a piece of gold in the crypt, pick it up and place it in the offering plate. This will unlock the door.

Once you unlock the door you head upstairs and down a long hallway to a circular room with a larger statue in it. When you enter the room the wall behind you will close. You can then interact with the statue and it will turn to the east wall the wall will open.

Once through the wall, a series of swing blade traps and fire traps will activate, the player must make their way down to the end and retrieve a shield. Once done the traps will stop, and the player will have a shield equipped that they will be able to block with. You will return to interact with the statue again.

This time the statue will turn to the west wall, the wall will open and the last wall will close. Once the player walks through the wall it will activate a series of flaming skulls being launched the hall. The player can dodge or block (using the shield) to make their way down the hallway. At the end the player will retrieve a sword and the skulls will stop spawning. Once again the character will return to interact with the statue.

This time the statue will turn to the north wall, a wall will open and the other wall will close. When the player goes through the wall, the wall will close behind them, and the wall in front of them will open reviewing another round room. Once the player enters the room, three flaming skulls will spawn and attack the player. The player can attack back with the sword or block with the shield, once the three skulls are defeated a new flaming skull will spawn. Once all the skulls are defeated you win and will be allowed to exit the crypt.


Concept Work:


Tuesday, April 17, 2012
Environments for Games - Project A
Here are the final results for my crypt scene in Unity3D. I had a lot of fun and really had to push myself to get this project completed in three weeks. I hope you enjoy the results!


The Crypt Asset Models

Unity3D Screenshots


Wednesday, April 11, 2012
Environments for Games - Project A Week 2
Here is an update on my progress for my environment / level. I have changed direction slightly, I am no longer building the scene for my old skeleton character. Instead I will be using it, or forcing it into, the current game concept I am working on. So I will be going for a more realistic feel with the textures and lighting. Worked hard to produce most of the assets I need for the environment. I have them modeled and unwraped but still need to create the materials and textures for the objects. I also have an update to the Unity build. It has been a busy week but I am more than happy with the results I am getting. I hope you enjoy!


Unity3D Build Status:


Tuesday, April 3, 2012
Environments for Games - Project A Week 1
I have started another quarter at SCAD and I am taking the Environments for Games course. I plan on really rocking out on the projects for this class this quarter, and I though it would be nice to keep a track of my progress. The first project was to create a room... I will be working on a crypt in Unit3D. Here are the results for week one: a perspective concept drawing and the scene laid out in Unity. There is also a small right up explaining the why's of the design.
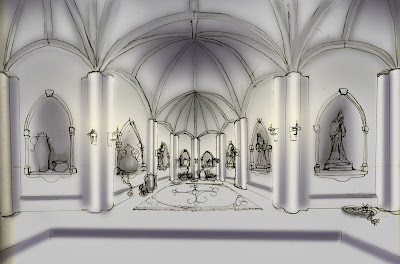


For Project A, a room, I will be creating a crypt. I do want the scene to be slightly stylized, think 10-15% cartoonish feel, that way it will match an old skeleton character I created years back. I have had thoughts of turning him into a game character and this project gives me an opportunity to set up his dwelling.
I will need to convey to the player that they are underground in the environment. I plan on getting this info across in several ways. The first and most obvious is the staircase with a door placed at the top of the ascending stairs. To push the illusion further the door will be horizontal, not vertical, to help connect the door with a basement/cellar door. This will also eliminate the possibility in the layers mind of the door leading to a second story and not the ground floor. The second tactic to push the player underground will be to place air vents (acting as windows) near the top of the walls giving the illusion that the walls are sunken down. And lastly the lack of real windows in the architecture helps solidify the fact that you are in an underground crypt.
I also want you to feel like you are in the basement of a much larger complex. One way I plan on achieving this through the use of “window” objects. There are several extrusions into the walls of the crypt; long rectangular cutouts for the dead and smaller cylindrical concave cutouts for idols and prayer offerings. This will give the walls of the structure the illusion of thickness and the ability to support the massive building above it. The ceiling was designed using multiple interconnecting arches, helping to support the illusion that this foundation can support the structure above. It also helps drive the eye upwards into the concave vaults, giving the illusion of extra space in the cramped quarters of the crypt and ultimately leading the player’s eye to their current goal; to find the way upward to the rest of the level/game.
At the polar end of the players start, his “bed”, there is a large concave section of the room. This is designed to help pull the player across the room and start the exploration process. In doing so the player will find the hallways leading to the stairs and ultimately to the exit of the crypt.
Friday, January 27, 2012
Biped 101: Basic Keyframing in Character Studio
Biped 101 - Basic Animation Workflow
Here is a video of a demonstration I did during a lecture. It follows a workflow I have developed over time to avoid common issues when animating in character studio. Below is the written breakdown of the process I use to animate the biped, taken from the very first post on 34Bit. I hope you enjoy.
Ralph Apgar's 4 1/2 Step Process for Key Framing in Character Studio
*Using this process involves using the Key Info rollout in Character Studio to record the keys. Do not use Auto Key or Set Key.
Step 1 -> 3: Setting the Tracks
The Tracks are located in the Character Studio Rollouts
Step 1: Select Track "Body Horizontal", Position the character along the X and Y axis. Record the key from the Key Info rollout. You need to realize that once you select any track you now have the Bip selected. The Tracks are how you move the biped in world space.
Step 2: Select Track "Body Vertical", Position the character along the Z axis. Record the key from the Key Info rollout.
Step 3: Select Track "Body Rotation", Rotate the character along the X,Y, and Z axis. Record the key from the Key Info rollout.
Step 4: Position your character into its proper pose. Once you have the desired look select the whole biped minus the Bip. To do this double click on the pelvis. If you have objects linked to the biped that don't belong, sword, shield, and object that isn't part of the original config, you will need to unselect those objects. If so make a selection set for easy selecting in the future. Next, Record the keys from the Key Info rollout.
Step 4 1/2: Choose your Planted, Free, and Sliding Keys. In the Key Info rollout you have some other key framing options that just normal key frames. The Planted Keys, used to plant feet and hand in world space. Sliding keys, used similar to Planted Keys but allow for slight movement. Free Keys are used to replicate a normal key. This step is about deciding what keys are your planted keys and what keys need t be free keys. For example, if your character is walking the foot that supports your characters weight will be the planted key frame, while on the other hand the foot that is in motion is a Free Key.
Subscribe to:
Posts (Atom)

